SpringMVC解析-DispatcherServlet組件初始化
摘要:通過在web.xml文件中配置的servlet參數contextAttribute來查找ServletContext中對應的屬性,默認爲WebApplicationContext.class.getName() + ".ROOT",也就是在ContextLoaderListener加載時會創建WebApplicationContext實例,並將實例以WebApplicationContext.class.getName() + ".ROOT"爲key放入ServletContext中,當然可以重寫初始化邏輯使用自己創建WebApplicationContext,並在servlet的配置中通過初始化參數contextAttribute指定key。上面的函數設計了計時器來統計初始化的執行時間,而且提供了一個擴展方法initFrameworkServelt()用於子類的覆蓋操作,而作爲關鍵的初始化邏輯實現委託給了initWebApplicationContext(). initWebApplicationContext函數的主要工作就是 創建或者刷新 WebApplicationContext實例 並對servlet功能所使用的變量進行初始化。
- DispatcherServlet的初始化
- DispatcherServlet的刷新
- 初始化MultipartResolver
- 初始化HandlerAdapters
- 初始化HandlerExceptionResolvers
- 初始化RequestToViewNameTranslator
- 初始化FlashMapManager
在spring中,ContextLoaderListener只是輔助功能,用於創建WebApplicationContext類型實例,而真正的邏輯實現其實是在DispatcherServlet中進行的,DispatcherServlet是實現servlet接口的實現類。
servlet是一個Java編寫的程序,此程序是基於HTTP協議的,在服務器端運行的(如Tomcat),是按照servlet規範編寫的一個java類。主要是處理客戶端的請求並將其結果發送到客戶端。servlet的生命週期是由servlet的容器來控制的,它可以分爲3個階段:初始化,運行和銷燬。
(1)初始化階段。
- servlet容器加載servlet類,把servlet類的.class文件中的數據讀到內存中。
- servlet容器創建一個ServletConfig對象。ServletConfig對象包含了servlet的初始化配置信息。
- servlet容器創建一個servlet對象
- servlet容器調用servlet對象的init方法進行初始化
(2)運行階段
當servlet容器接收到一個請求時,servlet容器會針對這個請求創建serlvetRequest和servletResponse對象,然後調用service方法。並把這兩個參數傳遞給service方法。service方法通過servletRequest對象獲得請求的信息。並處理該請求。再通過servletResponse對象生成這個請求的相應結果。然後銷燬servletResponse和servletRequest對象。
(3)銷燬階段
當web應用終止時,servlet容器會先調用servlet對象的destory方法,然後再銷燬servlet對象,同時銷燬servlet關聯的ServletConfig對象。我們可以在destroy方法的實現中,釋放servlet所佔用的資源,如關閉數據庫連接,關閉輸入輸出流等。
DispatcherServlet的初始化
servlet初始化階段會調用其init方法,所以我們看下DispatcherServle的init方法。在其父類HttpServletBean中找到了該方法。
public final void init() throws ServletException {
    if (logger.isDebugEnabled()) {
        logger.debug("Initializing servlet '" + getServletName() + "'");
    }
    // Set bean properties from init parameters.
    try {
        //解析init-param並封裝在pvs中
        PropertyValues pvs = new ServletConfigPropertyValues(getServletConfig(), this.requiredProperties);
        //將當前的這個servlet類轉化爲一個beanWrapper,從而能夠以Spring的方式來對init-param的值注入
        BeanWrapper bw = PropertyAccessorFactory.forBeanPropertyAccess(this);
        ResourceLoader resourceLoader = new ServletContextResourceLoader(getServletContext());
        //註冊自定義屬性編輯器,一旦遇到Resource類型的屬性將會使用ResourceEditor進行解析
        bw.registerCustomEditor(Resource.class, new ResourceEditor(resourceLoader, getEnvironment()));
        //空實現,留給子類覆蓋
        initBeanWrapper(bw);
        //屬性注入
        bw.setPropertyValues(pvs, true);
    }
    catch (BeansException ex) {
        logger.error("Failed to set bean properties on servlet '" + getServletName() + "'", ex);
        throw ex;
    }
    // Let subclasses do whatever initialization they like.
    //留給子類擴展
    initServletBean();
    if (logger.isDebugEnabled()) {
        logger.debug("Servlet '" + getServletName() + "' configured successfully");
    }
}
DispatcherServlet的初始化過程主要是通過將當前的servlet類型實例轉換爲BeanWrapper類型實例 ,以便使用Srping中提供的注入功能進行對應屬性的注入。這些屬性如contextAttribute,contxtClass,nameSpace,contextConfigLocation等,都可以在web.xml文件中以初始化參數的方式配置在servlet聲明中。DispatcherServlet繼承自FramworkServlet,FrameworkServlet類上包含對應的同名屬性,屬性注入主要包含如下步驟:
- 封裝及驗證初始化參數
- 將當前servlet實例轉化成BeanWrapper實例,PropertyAccessorFactory.forBeanPropertyAccess是Spring中提供的工具方法,主要用於將指定實例轉化爲Spring中可以處理的BeanWrapper類型的實例。
- 註冊相對於Resource的屬性編輯器
- 屬性注入
- servletBean的初始化
封裝及驗證初始化參數
public ServletConfigPropertyValues(ServletConfig config, Set<String> requiredProperties)
    throws ServletException {
    Set<String> missingProps = (requiredProperties != null && !requiredProperties.isEmpty()) ?
            new HashSet<String>(requiredProperties) : null;
    Enumeration en = config.getInitParameterNames();
    while (en.hasMoreElements()) {
        String property = (String) en.nextElement();
        Object value = config.getInitParameter(property);
        addPropertyValue(new PropertyValue(property, value));
        if (missingProps != null) {
            missingProps.remove(property);
        }
    }
    // Fail if we are still missing properties.
    if (missingProps != null && missingProps.size() > 0) {
        throw new ServletException(
            "Initialization from ServletConfig for servlet '" + config.getServletName() +
            "' failed; the following required properties were missing: " +
            StringUtils.collectionToDelimitedString(missingProps, ", "));
    }
}
servletBean的初始化
在ContextLoaderListener加載的時候已經創建了WebApplicationContext實例,而在這個函數最重要的就是對這個實例進行進一步的補充初始化。
繼續查看initServletBean()。父類FrameworkServlet覆蓋了HttpServletBean中的initServletBean,函數如下:
protected final void initServletBean() throws ServletException {
    getServletContext().log("Initializing Spring FrameworkServlet '" + getServletName() + "'");
    if (this.logger.isInfoEnabled()) {
        this.logger.info("FrameworkServlet '" + getServletName() + "': initialization started");
    }
    long startTime = System.currentTimeMillis();

    try {
        this.webApplicationContext = initWebApplicationContext();
        initFrameworkServlet();
    }
    catch (ServletException ex) {
        this.logger.error("Context initialization failed", ex);
        throw ex;
    }
    catch (RuntimeException ex) {
        this.logger.error("Context initialization failed", ex);
        throw ex;
    }

    if (this.logger.isInfoEnabled()) {
        long elapsedTime = System.currentTimeMillis() - startTime;
        this.logger.info("FrameworkServlet '" + getServletName() + "': initialization completed in " +
                elapsedTime + " ms");
    }
}
上面的函數設計了計時器來統計初始化的執行時間,而且提供了一個擴展方法initFrameworkServelt()用於子類的覆蓋操作,而作爲關鍵的初始化邏輯實現委託給了initWebApplicationContext(). initWebApplicationContext函數的主要工作就是 創建或者刷新 WebApplicationContext實例 並對servlet功能所使用的變量進行初始化 。
protected WebApplicationContext initWebApplicationContext() {
    WebApplicationContext rootContext =
            WebApplicationContextUtils.getWebApplicationContext(getServletContext());
    WebApplicationContext wac = null;
    if (this.webApplicationContext != null) {
        // A context instance was injected at construction time -> use it
        //context實例在構造函數中被注入
        wac = this.webApplicationContext;
        if (wac instanceof ConfigurableWebApplicationContext) {
            ConfigurableWebApplicationContext cwac = (ConfigurableWebApplicationContext) wac;
            if (!cwac.isActive()) {
                // The context has not yet been refreshed -> provide services such as
                // setting the parent context, setting the application context id, etc
                if (cwac.getParent() == null) {
                    // The context instance was injected without an explicit parent -> set
                    // the root application context (if any; may be null) as the parent
                    cwac.setParent(rootContext);
                }
                //刷新上下文環境,初始化Spring環境包括加載配置文件等
                configureAndRefreshWebApplicationContext(cwac);
            }
        }
    }
    if (wac == null) {
        // No context instance was injected at construction time -> see if one
        // has been registered in the servlet context. If one exists, it is assumed
        // that the parent context (if any) has already been set and that the
        // user has performed any initialization such as setting the context id
        //根據contextAttribute屬性加載WebApplicationContext
        wac = findWebApplicationContext();
    }
    if (wac == null) {
        // No context instance is defined for this servlet -> create a local one
        wac = createWebApplicationContext(rootContext);
    }

    if (!this.refreshEventReceived) {
        // Either the context is not a ConfigurableApplicationContext with refresh
        // support or the context injected at construction time had already been
        // refreshed -> trigger initial onRefresh manually here.
        onRefresh(wac);
    }

    if (this.publishContext) {
        // Publish the context as a servlet context attribute.
        String attrName = getServletContextAttributeName();
        getServletContext().setAttribute(attrName, wac);
        if (this.logger.isDebugEnabled()) {
            this.logger.debug("Published WebApplicationContext of servlet '" + getServletName() +
                    "' as ServletContext attribute with name [" + attrName + "]");
        }
    }

    return wac;
}
上面代碼前面都是在獲取webApplicationContext,後面有這樣一行代碼,我們看下: configureAndRefreshWebApplicationContext
protected void configureAndRefreshWebApplicationContext(ConfigurableWebApplicationContext wac) {
    if (ObjectUtils.identityToString(wac).equals(wac.getId())) {
        // The application context id is still set to its original default value
        // -> assign a more useful id based on available information
        if (this.contextId != null) {
            wac.setId(this.contextId);
        }
        else {
            // Generate default id...
            ServletContext sc = getServletContext();
            if (sc.getMajorVersion() == 2 && sc.getMinorVersion() < 5) {
                // Servlet <= 2.4: resort to name specified in web.xml, if any.
                String servletContextName = sc.getServletContextName();
                if (servletContextName != null) {
                    wac.setId(ConfigurableWebApplicationContext.APPLICATION_CONTEXT_ID_PREFIX + servletContextName +
                            "." + getServletName());
                }
                else {
                    wac.setId(ConfigurableWebApplicationContext.APPLICATION_CONTEXT_ID_PREFIX + getServletName());
                }
            }
            else {
                // Servlet 2.5's getContextPath available!
                wac.setId(ConfigurableWebApplicationContext.APPLICATION_CONTEXT_ID_PREFIX +
                        ObjectUtils.getDisplayString(sc.getContextPath()) + "/" + getServletName());
            }
        }
    }
    wac.setServletContext(getServletContext());
    wac.setServletConfig(getServletConfig());
    wac.setNamespace(getNamespace());
    wac.addApplicationListener(new SourceFilteringListener(wac, new ContextRefreshListener()));
    // The wac environment's #initPropertySources will be called in any case when the context
    // is refreshed; do it eagerly here to ensure servlet property sources are in place for
    // use in any post-processing or initialization that occurs below prior to #refresh
    ConfigurableEnvironment env = wac.getEnvironment();
    if (env instanceof ConfigurableWebEnvironment) {
        ((ConfigurableWebEnvironment) env).initPropertySources(getServletContext(), getServletConfig());
    }
    postProcessWebApplicationContext(wac);
    applyInitializers(wac);
    //加載配置文件及整合parent到wac
    wac.refresh();
}
無論調用方式如何變化,只要是使用ApplicationContext所提供的功能,最後都免不了使用公共父類AbstractApplicationContext提供的refresh()進行配置文件加載。對於本函數中的初始化主要包含幾個部分。
1.尋找或創建對應的WebApplicationContext實例
- 通過構造函數的注入進行初始化。當進入initWebApplicationContext函數後通過判斷this.webApplicationContext != null後,便可以確定this.webApplicationContext是否是通過構造函數來初始化的。 在Web中包含SpringWeb的核心邏輯的DispatcherServlet只可以被聲明爲一次,在Spring中已經存在驗證,所以這就確保瞭如果this.webApplicationContext != null,則可以直接判定this.webApplicationContext已經通過構造函數初始化。
- 通過contextAttribute進行初始化,findWebApplicationContext()。通過在web.xml文件中配置的servlet參數contextAttribute來查找ServletContext中對應的屬性,默認爲WebApplicationContext.class.getName() + ".ROOT",也就是在ContextLoaderListener加載時會創建WebApplicationContext實例,並將實例以WebApplicationContext.class.getName() + ".ROOT"爲key放入ServletContext中,當然可以重寫初始化邏輯使用自己創建WebApplicationContext,並在servlet的配置中通過初始化參數contextAttribute指定key。
- 重新創建WebApplicationContext實例,createWebApplicationContext。如果通過以上兩種方式並沒有找到任何突破,那就沒辦法了,只能在這裏重新創建新的實例了。
2.configureAndRefreshWebApplicationContext。無論是通過構造函數注入還是單獨創建,都免不了會調用configureAndRefreshWebApplicationContext方法來對已經創建的WebApplicationContext實例進行配置及刷新。
3.DispatcherServlet的刷新
DispatcherServlet的刷新
onRefresh是FrameworkServletl類中提供的模板方法,在其子類DispatcherServlet中進行了重寫,主要用於刷新Spring在web功能實現中所必須使用的全局變量。介紹一下初始化過程以及使用場景,具體的使用細節在下一篇解析再做詳細介紹。
protected void onRefresh(ApplicationContext context) {
    initStrategies(context);
}
protected void initStrategies(ApplicationContext context) {
    //初始化MultipartResolver
    initMultipartResolver(context);
    //初始化LocaleResolver
    initLocaleResolver(context);
    //初始化ThemeResolver
    initThemeResolver(context);
    //初始化HandlerMappings
    initHandlerMappings(context);
    //初始化HandlerAdapter
    initHandlerAdapters(context);
    //初始化HandlerExcpetionResolvers
    initHandlerExceptionResolvers(context);
    //初始化RequestToViewNameTranslator
    initRequestToViewNameTranslator(context);
    //初始化ViewResolvers
    initViewResolvers(context);
    //初始化FlashMapManager
    initFlashMapManager(context);
}
初始化MultipartResolver
在Spring中,MultipartResolver主要用來處理文件上傳。默認情況下,Spring是沒有multipart處理的,因爲一些開發者想要自己處理它們。如果想使用Spring的multipart,則需要在Web應用的上下文中添加multipart解析器。這樣,每個請求都被檢查是否包含multipart。如果請求中包含multipart,那麼上下文中定義的MultipartResolver就會解析它,這樣請求中的multipart屬性就會象其他屬性一樣被處理。常用配置如下:
<bean id="multipartResolver" class="org.springframework.web.multipart.commons.CommonsMultipartResolver">
    <!-- 設置上傳文件大小的參數-->
    <property name="resolveLazily" value="true"/>
    <!--btye爲單位,5M-->
    <property name="maxUploadSize" value="5242880"/>
</bean>
因爲之前的步驟已經完成了Spring中配置文件的解析,所以在這裏只要配置文件註冊過都可以通過ApplicationContext提供了getBean方法獲取對應的bean,進而初始化MultipartResolver中的multipartResolver變量。
初始化LocaleResolver
在Spring的國際化配置中一共有3種使用方式。
(1)基於URL參數的配置。通過URL參數來控制國際化,比如你在頁面上加一句簡體中文來控制項目中使用的國際化參數。
< a href= "myTest.jsp?locale=zh_CN">簡體中文 </ a>
而提供這個功能的就是AcceptHeaderLocaleResolver,默認的參數名爲locale,注意大小寫。裏面放的就是你的提交參數,比如en_US、zh_CN之類的,具體配置如下;
<bean id="localeResolver" class="org.springframework.web.servlet.i18n.AcceptHeaderLocaleResolver"></bean>
(2)基於session的配置。它通過檢驗用戶會話中預置的屬性來解析區域。最常用的是根據用戶本次會話過程中的語言設定決定語言種類(例如,用戶登錄時選擇語言種類,則此次登錄週期內統一使用此語言設定),如果該會話屬性不存在,它會根據accept-language HTTP頭部確定默認區域。
<bean id="localeResolver" class="org.springframework.web.servlet.i18n.SessionLocaleResolver"></bean>
(3)基於Cookie的國際化配置。CookieLocaleResolver用於通過瀏覽器的cookie設置取得Locale對象。這種策略在應用程序不支持會話或者狀態必須保存在客戶端時有用,配置如下:
<bean id="localeResolver" class="org.springframework.web.servlet.i18n.CookieLocaleResolver"/>
這三種方式都可以解決國際化的問題,對應的攔截方式:
<bean id="localeChangeInterceptor" class="org.springframework.web.servlet.i18n.LocaleChangeInterceptor" />
在mapping url映射的時候,可以調用這個屬性來跳轉的時候,進行國際化的攔截。
初始化ThemeResolver
在Web開發中經常會遇到主題Theme來控制網頁風格,這將進一步改善用戶體驗,簡單說就是一個主題就是一組靜態資源,可以影響應用程序的視覺效果。Spring中的主題功能和國際化功能非常相似,構成Spring主題功能主要包括如下內容。
(1)主題資源。Spring中的ThemeSource是Spring中主題資源的接口,Spring的主題需要通過ThemeSource接口來實現存放主題信息的資源。 ResourceBundleThemeSource是ThemeSource接口默認實現類,在Spring中的配置如下:
<bean id="themsSource" class="org.Springframework.ui.context.support.ResourceBundleThemeSource"> </bean>
默認狀態下是在類路徑根目錄下查找相應的資源文件,也可以通過beasenamePrefix指定查找資源文件的包路徑。
(2)主題解析器。
ThemeSource定義了一些主題資源,ThemeResolver是主題解析器的接口,主題解析的工作則是其子類完成的。
對於主題解析器,主要有三個比較常見的實現,以主題summer.properties爲例。
FixedThemeResolver:用於選擇一個固定的主題。
<bean id="themeResolver" class="org.Springframework.web.servlet.theme.FixedThemeResolver">
  <property name="defaultThemeName" value="主題名" />
</bean>
CookieThemeResolver:用於實現用戶所選的主題,以Cookie的方式存放在客戶端的機器上。
<bean id="themeResolver" class="org.Springframework.web.servlet.theme.CookieThemeResolver">
  <property name="defaultThemeName" value="主題名" />
</bean>
SessionThemeResolver:用戶主題保存在用戶的HTTP Session中。
<bean id="themeResolver" class="org.Springframework.web.servlet.theme.SessionThemeResolver">
  <property name="defaultThemeName" value="主題名" />
</bean>
以上配置用於設置主題名稱,並將該名稱保存在用戶的HttpSession中。
另外,對於FixedThemeResolver和SessionThemeResolver,共同繼承了AbstractThemeResolver類。用戶也可以自己實現自己的解析器繼承AbstractThemeResolver類。
(3)攔截器。
如果需要根據用戶請求來改變主題,那麼Spring提供了一個已經實現的攔截器ThemeChangeInterceptor攔截器,具體的配置如下:
<bean id="themeChangeInterceptor" class="org.Springframework.web.servlet.theme.ThemeChangeInterceptor">
  <property name="paramName" value="themeName"></property>
</bean>
其中設置用戶請求參數名爲themeName,即URL爲?themeName=具體的主題名稱。此外還需要在handlerMapping中配置攔截器。
    <property name="interceptors">
        <list>
            <ref local="themeChangeInterceptor" />
        </list>
    </property>
初始化HandlerMappings
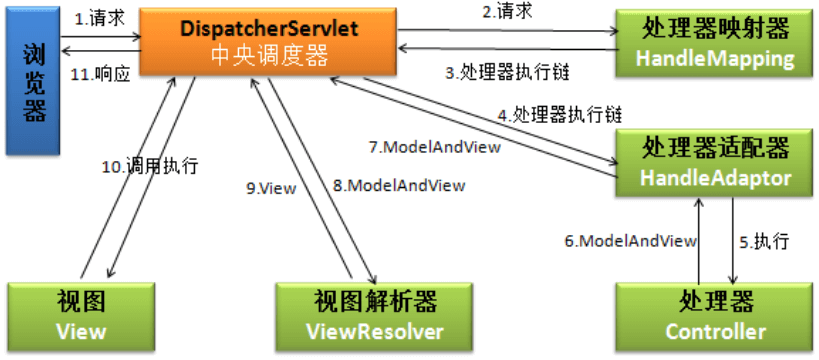
當客戶端發出Request時DispatcherServlet會將Request提交給HandlerMaping,然後HandlerMapping根據WebApplicationContext的配置來回傳給DispatcherServlet相應的Controller.
在基於SpringMVC的web應用程序中,我們可以爲DispatcherServlet提供多個HandlerMapping供其使用 。 DispatcherServlet在選用HandlerMapping的過程中,將根據我們所制定的一系列HandlerMapping的優先級進行排序,然後優先使用優先級在前面的handlerMapping.如果當前的HandlerMapping能夠返回可用的Handler,DispatcherSevlet則使用當前返回的Handler進行Web請求的處理。而不再繼續詢問其他的HandlerMapping。否則,DispatcherServlet將繼續按照各個handlerMapping的優先級進行詢問,直到獲得一個可用的Handler爲止。初始化配置如下:
private void initHandlerMappings(ApplicationContext context) {
    this.handlerMappings = null;
    if (this.detectAllHandlerMappings) {
        // Find all HandlerMappings in the ApplicationContext, including ancestor contexts.
        Map<String, HandlerMapping> matchingBeans =
                BeanFactoryUtils.beansOfTypeIncludingAncestors(context, HandlerMapping.class, true, false);
        if (!matchingBeans.isEmpty()) {
            this.handlerMappings = new ArrayList<HandlerMapping>(matchingBeans.values());
            // We keep HandlerMappings in sorted order.
            OrderComparator.sort(this.handlerMappings);
        }
    }
    else {
        try {
            HandlerMapping hm = context.getBean(HANDLER_MAPPING_BEAN_NAME, HandlerMapping.class);
            this.handlerMappings = Collections.singletonList(hm);
        }
        catch (NoSuchBeanDefinitionException ex) {
            // Ignore, we'll add a default HandlerMapping later.
        }
    }
    // Ensure we have at least one HandlerMapping, by registering
    // a default HandlerMapping if no other mappings are found.
    if (this.handlerMappings == null) {
        this.handlerMappings = getDefaultStrategies(context, HandlerMapping.class);
        if (logger.isDebugEnabled()) {
            logger.debug("No HandlerMappings found in servlet '" + getServletName() + "': using default");
        }
    }
}
默認情況下,SpringMVC將加載當前系統中所有實現了HandlerMapping接口的bean。如果只期望SpringMVC加載指定的handlermapping時,可以修改web.xml中的DispatcherServlet的初始化參數,將detectAllHandlerMappings的值設置爲false:
<init-param>
      <param-name>detectAllHandlerMappings</param-name>
      <param-value>false</param-value>
</init-param>
此時,SpringMVC將查找名爲“handlerMapping”的bean,並作爲當前系統中唯一的handlermapping.如果沒有沒有定義handlerMapping的話,則SpringMVC將按照org.Springframeword.web.servlet.DispatcherServlet所在目錄下的 DispatcherServlet.properties 中所定義的org.Springframeword.web.servlet.HandlerMapping的內容來加載默認的handlerMapping(用戶沒有自定義Strategies的情況下)
DispatcherServlet.properties
org.springframework.web.servlet.LocaleResolver=org.springframework.web.servlet.i18n.AcceptHeaderLocaleResolver

org.springframework.web.servlet.ThemeResolver=org.springframework.web.servlet.theme.FixedThemeResolver

org.springframework.web.servlet.HandlerMapping=org.springframework.web.servlet.handler.BeanNameUrlHandlerMapping,\
    org.springframework.web.servlet.mvc.annotation.DefaultAnnotationHandlerMapping

org.springframework.web.servlet.HandlerAdapter=org.springframework.web.servlet.mvc.HttpRequestHandlerAdapter,\
    org.springframework.web.servlet.mvc.SimpleControllerHandlerAdapter,\
    org.springframework.web.servlet.mvc.annotation.AnnotationMethodHandlerAdapter

org.springframework.web.servlet.HandlerExceptionResolver=org.springframework.web.servlet.mvc.annotation.AnnotationMethodHandlerExceptionResolver,\
    org.springframework.web.servlet.mvc.annotation.ResponseStatusExceptionResolver,\
    org.springframework.web.servlet.mvc.support.DefaultHandlerExceptionResolver

org.springframework.web.servlet.RequestToViewNameTranslator=org.springframework.web.servlet.view.DefaultRequestToViewNameTranslator

org.springframework.web.servlet.ViewResolver=org.springframework.web.servlet.view.InternalResourceViewResolver

org.springframework.web.servlet.FlashMapManager=org.springframework.web.servlet.support.SessionFlashMapManager
初始化HandlerAdapters
從名字也能聯想到這個一個典型的適配器模式的使用,在計算機編程中,適配器模式將一個類的接口適配成用戶所期待的。使用適配器,可以使接口而無法一起工作的的類協同工作,做法是將類自己的接口包裹在一個已經存在的類中。那麼在處理handler中爲什麼會使用適配模式呢?我們看下他的初始化邏輯。
private void initHandlerAdapters(ApplicationContext context) {
    this.handlerAdapters = null;

    if (this.detectAllHandlerAdapters) {
        // Find all HandlerAdapters in the ApplicationContext, including ancestor contexts.
        Map<String, HandlerAdapter> matchingBeans =
                BeanFactoryUtils.beansOfTypeIncludingAncestors(context, HandlerAdapter.class, true, false);
        if (!matchingBeans.isEmpty()) {
            this.handlerAdapters = new ArrayList<HandlerAdapter>(matchingBeans.values());
            // We keep HandlerAdapters in sorted order.
            OrderComparator.sort(this.handlerAdapters);
        }
    }
    else {
        try {
            HandlerAdapter ha = context.getBean(HANDLER_ADAPTER_BEAN_NAME, HandlerAdapter.class);
            this.handlerAdapters = Collections.singletonList(ha);
        }
        catch (NoSuchBeanDefinitionException ex) {
            // Ignore, we'll add a default HandlerAdapter later.
        }
    }

    // Ensure we have at least some HandlerAdapters, by registering
    // default HandlerAdapters if no other adapters are found.
    if (this.handlerAdapters == null) {
        this.handlerAdapters = getDefaultStrategies(context, HandlerAdapter.class);
        if (logger.isDebugEnabled()) {
            logger.debug("No HandlerAdapters found in servlet '" + getServletName() + "': using default");
        }
    }
}
同樣在初始化的過程中涉及了一個變量detectAllHandlerAdapters,detectAllhandlerAdapters作用和detectAllHandlerMappings類似,只不過作用對象爲handlerAdapter。也可以通過如下配置強制系統只加載beanname爲“handlerAdapteer”的handlerAdapter。
<init-param>
     <param-name>detectAllhandlerAdapters</param-name>
     <param-value>false</param-value>
</init-param>
如果無法找得到對應的bean,那麼系統會嘗試加載默認的適配器。
protected <T> List<T> getDefaultStrategies(ApplicationContext context, Class<T> strategyInterface) {
    String key = strategyInterface.getName();
    String value = defaultStrategies.getProperty(key);
    if (value != null) {
        String[] classNames = StringUtils.commaDelimitedListToStringArray(value);
        List<T> strategies = new ArrayList<T>(classNames.length);
        for (String className : classNames) {
            try {
                Class<?> clazz = ClassUtils.forName(className, DispatcherServlet.class.getClassLoader());
                Object strategy = createDefaultStrategy(context, clazz);
                strategies.add((T) strategy);
            }
            catch (ClassNotFoundException ex) {
                throw new BeanInitializationException(
                        "Could not find DispatcherServlet's default strategy class [" + className +
                                "] for interface [" + key + "]", ex);
            }
            catch (LinkageError err) {
                throw new BeanInitializationException(
                        "Error loading DispatcherServlet's default strategy class [" + className +
                                "] for interface [" + key + "]: problem with class file or dependent class", err);
            }
        }
        return strategies;
    }
    else {
        return new LinkedList<T>();
    }
}
在getDefaultStrategies函數中,Spring會嘗試從defaultStrategies中加載對應的HandlerAdapter屬性,那麼defaultStrategies是如何初始化的呢?
在 當前類DispatcherServlet 中存在這樣一段初始化代碼塊:
static {
    // Load default strategy implementations from properties file.
    // This is currently strictly internal and not meant to be customized
    // by application developers.
    try {
        ClassPathResource resource = new ClassPathResource(DEFAULT_STRATEGIES_PATH, DispatcherServlet.class);
        defaultStrategies = PropertiesLoaderUtils.loadProperties(resource);
    }
    catch (IOException ex) {
        throw new IllegalStateException("Could not load 'DispatcherServlet.properties': " + ex.getMessage());
    }
}
在系統加載的時候,defaultStrategies根據當前路徑DispatcherServlet.properties來初始化本身,查看DispatcherServlet.properties中對應於HandlerAdapter的屬性:
org.Springframework.web.servlet.HandlerAdapter=org.Springframework.web.servlet.mvc.HttpRequestHandlerAdapter,\
org.Springframework.web.servlet.mvc.SimpleControllerHandlerAdapter,\
org.Springframework.web.servlet.mvc.annotation.AnnotationMethodHandlerAdapter
由此得知,如果程序開發人員沒有在配置文件中定義自己的適配器,那麼Spring會默認加載配置文件中的3個適配器。
作爲總控制器的派遣器servlet通過處理器映射得到處理器後,會 輪詢 處理器適配器模塊,查找能夠處理當前HTTP請求的處理器適配器的實現,處理器適配器模塊根據處理器映射返回的處理器類型,例如簡單的控制器類型、註解控制器類型或者遠程調用處理器類型,來選擇某一個適當的處理器適配器的實現,從而適配當前的HTTP請求。
- HTTP請求處理器適配器(HttpRequestHandlerAdapter)。HTTP請求處理器適配器僅僅支持對HTTP請求處理器的適配。它簡單地將HTTP請求對象和響應對象傳遞給HTTP請求處理器的實現,它並不需要返回值。它主要應用在基於HTTP的遠程調用的實現上。
- 簡單控制器處理器適配器(SimpleControllerHandlerAdapter)。這個實現類將HTTP請求適配到一個控制器的實現進行處理。這裏控制器的實現是一個簡單的控制器接口的實現。簡單控制器處理器適配器被設計成一個框架類的實現,不需要被改寫,客戶化的業務邏輯通常是在控制器接口的實現類中實現的。
- 註解方法處理器適配器(AnnotationMethodHandlerAdapter)。這個類的實現是基於註解的實現,它需要結合註解方法映射和註解方法處理器協同工作。它通過解析聲明在註解控制器的請求映射信息來解析相應的處理器方法來處理當前的HTTP請求。在處理的過程中,它通過反射來發現探測處理器方法的參數,調用處理器方法,並且映射返回值到模型和控制器對象,最後返回模型和控制器對象給作爲主控制器的派遣器Servlet。
Spring中所使用的Handler並沒有任何特殊的聯繫,但是爲了統一處理,Spring提供了不同情況下的適配器。
初始化HandlerExceptionResolvers
@Component
public class ExceptionHandler implements HandlerExceptionResolver {
    private static final Log logs = LogFactory.getLog(ExceptionHandler.class);

    @Override
    public ModelAndView resolveException(HttpServletRequest request, HttpServletResponse response, Object obj,
                                         Exception exception) {
        request.setAttribute("exception", exception.toString());
        request.setAttribute("exceptionStack", exception);
        logs.error(exception.toString(), exception);
        return new ModelAndView("error/exception");
    }
}
使用這種異常處理方式,需要實現resolveException方法,該方法返回一個ModelAndView對象,在方法內部對異常的類型進行判斷,然後嘗試生成對應的ModelAndView對象,如果該方法返回了null,則Spring會繼續尋找其他的實現了HandlerExceptionResolver接口的bean,直到返回一個ModelAndView對象。
配置如下:
<bean id="exceptionHandler" class="com.test.exception.ExceptionHandler" />
初始化RequestToViewNameTranslator
當Controller處理器方法沒有返回一個View對象或邏輯視圖名稱,並且在該方法中沒有直接往response的輸出流裏面寫數據的時候,Spring就會採用約定好的方式提供一個邏輯視圖名稱。這個邏輯視圖名稱是通過Spring定義的org.Springframework.web.servlet.RequestToView NameTranslator接口的getViewName方法來實現的,我們可以實現自己的Request ToViewName Translator接口來約定好沒有返回視圖名稱的時候如何確定視圖名稱。Spring已經給我們提供了一個它自己的實現,那就是org.Springframework.web.servlet.view.DefaultRequestToViewNameTranslator。
在介紹DefaultRequestToViewNameTranslator是如何約定視圖名稱之前,先來看一下它支持用戶定義的屬性。
prefix:前綴,表示約定好的視圖名稱需要加上的前綴,默認是空串。
suffix:後綴,表示約定好的視圖名稱需要加上的後綴,默認是空串。separator:分隔符,默認是斜槓“/”。
stripLeadingSlash:如果首字符是分隔符,是否要去除,默認是true。
stripTrailingSlash:如果最後一個字符是分隔符,是否要去除,默認是true。
stripExtension:如果請求路徑包含擴展名是否要去除,默認是true。
urlDecode:是否需要對URL解碼,默認是true。它會採用request指定的編碼或者
ISO-8859-1編碼對URL進行解碼。
當我們沒有在SpringMVC的配置文件中手動的定義一個名爲viewNameTranlator的Bean的時候,Spring就會爲我們提供一個默認的viewNameTranslator,即DefaultRequestToViewName Translator。
接下來看一下,當Controller處理器方法沒有返回邏輯視圖名稱時,DefaultRequestToView NameTranslator是如何約定視圖名稱的。DefaultRequestToViewNameTranslator會獲取到請求的URI,然後根據提供的屬性做一些改造,把改造之後的結果作爲視圖名稱返回。這裏以請求路徑http://localhost/app/test/index.html爲例,來說明一下DefaultRequestToViewNameTranslator是如何工作的。該請求路徑對應的請求URI爲/test/index.html,我們來看以下幾種情況,它分別對應的邏輯視圖名稱是什麼。
- prefix和suffix如果都存在,其他爲默認值,那麼對應返回的邏輯視圖名稱應該是prefixtest/indexsuffix。
- stripLeadingSlash和stripExtension都爲false,其他默認,這時候對應的邏輯視圖名稱是/product/index.html。
- 都採用默認配置時,返回的邏輯視圖名稱應該是product/index。
如果邏輯視圖名稱跟請求路徑相同或者相關關係都是一樣的,那麼我們就可以採用Spring爲我們事先約定好的邏輯視圖名稱返回,這可以大大簡化我們的開發工作。
初始化ViewResolvers
在SpringMVC中,當Controller將請求處理結果放入到ModelAndView中以後,DispatcherServlet會根據ModelAndView選擇合適的視圖進行渲染。那麼在SpringMVC中是如何選擇合適的View呢?View對象是如何創建的呢?答案在ViewResolver中。ViewResolver接口定義了resolverViewName方法,根據viewName創建合適類型的View實現。
那麼如何配置ViewResolver呢?在Spring中,ViewResolver作爲SpringBean存在,可以在配置文件中進行配置,例如下面的代碼,配置了JSP相關的veiwResolver.
<bean
    class="org.springframework.web.servlet.view.InternalResourceViewResolver">
    <property name="prefix" value="/view/" />
    <property name="suffix" value=".jsp" />
</bean>
初始化FlashMapManager
SpringMVC Flash attributs提供了一個請求存儲屬性,可供其他請求使用。在使用重定向的時候非常必要,例如Post/Redirect/Get模式。Flash attributes在重定向之前暫存(就像存在session中)以便重定向之後還能使用,並立即刪除。
SpringMVC有兩個主要的抽象來支持flasth attributes。 FlashMap 用於保持flash attributes,而 FlashMapManager 用於存儲,檢索,管理FlashMap實例。
flash attribute支持默認開始(“on”)並不需要顯示啓用,它永遠不會導致HTTPSession的創建。這兩個FlashMap實例都可以通過靜態方法RequestContextUtils從SpringMVC的任何位置訪問。
如有疑問或同行交流歡迎加羣討論:  151258054