Spring Boot 集成MyBatis
一、前言
一個現實的場景是:當我們開發一個Web工程時,架構師和開發工程師可能更關心項目技術結構上的設計。而幾乎所有結構良好的軟件(項目)都使用了分層設計。分層設計是將項目按技術職能分爲幾個內聚的部分,從而將技術或接口的實現細節隱藏起來。

從另一個角度上來看,結構上的分層往往也能促進了技術人員的分工,可以使開發人員更專注於某一層業務與功能的實現,比如前端工程師只關心頁面的展示與交互效果(例如專注於HTML,JS等),而後端工程師只關心數據和業務邏輯的處理(專注於Java,Mysql等)。兩者之間通過標準接口(協議)進行溝通。
在實現分層的過程中我們會使用一些框架,例如SpringMVC。但利用框架帶來了一些使用方面的問題。我們經常要做的工作就是配置各種XML文件,然後還需要搭建配置Tomcat或者Jetty作爲容器來運行這個工程。每次構建一個新項目,都要經歷這個流程。更爲不幸的是有時候前端人員爲了能在本地調試或測試程序,也需要先配置這些環境,或者需要後端人員先實現一些服務功能。這就和剛纔提到的“良好的分層結構”相沖突。
每一種技術和框架都有一定的學習曲線。開發人員需要了解具體細節,才知道如何把項目整合成一個完整的解決方案。事實上,一個整合良好的項目框架不僅僅能實現技術、業務的分離,還應該關注並滿足開發人員的“隔離”。
爲了解決此類問題,便產生了Spring Boot這一全新框架。Spring Boot就是用來簡化Spring應用的搭建以及開發過程。該框架致力於實現免XML配置,提供便捷,獨立的運行環境,實現“一鍵運行”滿足快速應用開發的需求。
與此同時,一個完整的Web應用難免少不了數據庫的支持。利用JDBC的API需要編寫複雜重複且冗餘的代碼。而使用O/RM(例如Hibernate)工具需要基於一些假設和規則,例如最普遍的一個假設就是數據庫被恰當的規範了。 這些規範在現實項目中並非能完美實現。由此,誕生了一種混合型解決方案——Mybatis。 Mybatis是一個持久層框架 , 它從各種數據庫訪問工具中汲取大量優秀的思想,適用於任何大小和用途的數據庫。根據官方文檔的描述:MyBatis 是支持定製化 SQL、存儲過程以及高級映射的優秀的持久層框架。M yBatis 避免了幾乎所有的 JDBC 代碼和手動設置參數以及獲取結果集。MyBatis 可以對配置和原生Map使用簡單的 XML 或註解,將接口和 Java 的 POJOs(Plain Old Java Objects,普通的 Java對象)映射成數據庫中的記錄。
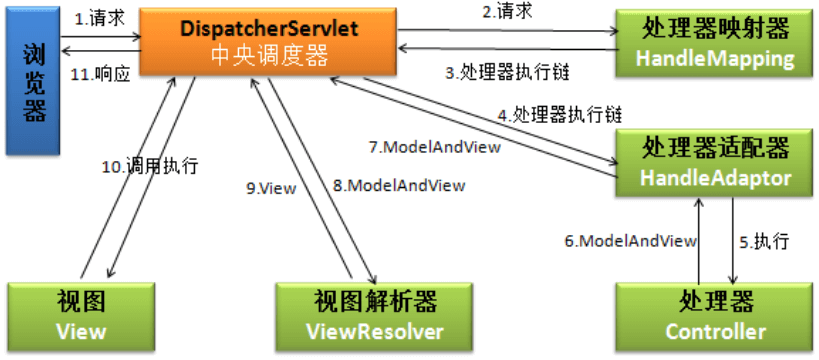
最後,再回到技術結構分層上,目前主流倡導的設計模式爲MVC,即模型(model)-視圖(view)-控制器(controller)。實現該設計模式的框架有很多,例如Struts。而前文提到的SpringMVC是另一個更爲優秀,靈活易用的MVC框架。 SpringMVC是一種基於Java的以請求爲驅動類型的輕量級Web框架,其目的是將Web層進行解耦,即使用“請求-響應”模型,從工程結構上實現良好的分層,區分職責,簡化Web開發。
目前,對於如何把這些技術整合起來形成一個完整的解決方案,並沒有相關的最佳實踐。將Spring Boot和Mybatis兩者整合使用的資料和案例較少。因此,本文提供(介紹)一個完整利用SpringBoot和Mybatis來構架Web項目的案例。該案例基於SpringMVC架構提供完整且簡潔的實現Demo,便於開發人員根據不同需求和業務進行拓展。
補充提示,Spring Boot 推薦採用基於 Java 註解的配置方式,而不是傳統的 XML。只需要在主配置 Java 類上添加“@EnableAutoConfiguration”註解就可以啓用自動配置。 Spring Boot 的自動配置功能是沒有侵入性的,只是作爲一種基本的默認實現。開發人員可以通過定義其他 bean 來替代自動配置所提供的功能,例如在配置本案例數據源(DataSource)時,可以體會到該用法。
=====================
首先分析一下各個框架的職責:
SpringMVC:負責表現層
Service接口:處理業務
Mapper:持久層
spring負責將各層之間整合
通過Spring管理持久層的mapper(相當於Dao接口)
通過Spring管理業務層的service,service中可以調用mapper接口
Spring進行事務控制
通過Spring管理表現層handler,handler中可以調用service接口
mapper、service、handler都屬於javabean
二、集成MyBatis
Spring Boot 集成MyBatis有兩種方式,一種簡單的方式就是使用MyBatis官方提供的:
Mybatis 官方提供了 mybatis-spring-boot-starter
https://github.com/mybatis/spring-boot-starter
http://www.mybatis.org/spring-boot-starter/mybatis-spring-boot-autoconfigure/
另外一種方式就是仍然用類似 mybatis-spring
的配置方式,這種方式需要自己寫一些代碼,但是可以很方便的控制MyBatis的各項配置。
mybatis有很多優點。
- 易於上手和掌握。
- sql寫在xml裏,便於統一管理和優化。
- 解除sql與程序代碼的耦合。
- 提供映射標籤,支持對象與數據庫的orm字段關係映射
- 提供對象關係映射標籤,支持對象關係組建維護
- 提供xml標籤,支持編寫動態sql。
缺點:筆者自己總結了下(建議使用註解和sql 構建器來寫mybatis ,如果使用xml 就會有一些麻煩事了。)
- 其實在開發過程中還是有一些不方便的地方以下列成幾種。大多數人習慣於xml 形式。spring loader 不支持熱部署xml 的。如果寫入sql 構建器。就是通過java 代碼來構建sql 又很多人不是特別瞭解。所以,你改一次就要重啓。就有點麻煩了。(筆者最不喜歡就是幹浪費時間的事了。)
- 就是mybatis 每次寫一個實體的查詢語句。就要建立一個mapper 和xml 進行映射。這樣Mapper越來越多和xml 越來越多。感覺不好管理,= = !。
三、mybatis-spring-boot-starter方式
1、在 pom.xml
中添加依賴:
需要導入 mybatis-spring-boot-starter
<dependency>
    <groupId>org.mybatis.spring.boot</groupId>
    <artifactId>mybatis-spring-boot-starter</artifactId>
    <version>1.0.0</version>
</dependency>
MySQL:
<!-- https://mvnrepository.com/artifact/mysql/mysql-connector-java -->
<dependency>
<groupId>mysql</groupId>
<artifactId>mysql-connector-java</artifactId>
</dependency>
mybatis-spring-boot-starter
依賴樹如下:

其中 mybatis
使用的3.3.0版本,可以通過:
<mybatis.version>3.3.0</mybatis.version>
屬性修改默認版本。
mybatis-spring
使用版本1.2.3,可以通過:
<mybatis-spring.version>1.2.3</mybatis-spring.version>
修改默認版本。
2. 配置文件、application.properties
jdbc.driverClassName = com.mysql.jdbc.Driver
jdbc.url = jdbc:mysql://xxx:3306/mytestdb?zeroDateTimeBehavior=convertToNull&useUnicode=true&characterEncoding=utf-8
jdbc.username = root
jdbc.password = vvvxxx


mybatis.typeAliasesPackage=com.xxx.firstboot.domain
mybatis.mapperLocations=classpath:mapper/*.xml
說明:
- mybatis.typeAliasesPackage:指定domain類的基包,即指定其在*Mapper.xml文件中可以使用簡名來代替全類名(看後邊的UserMapper.xml介紹)
-
mybatis.mapperLocations:指定*Mapper.xml的位置
除了上面常見的兩項配置,還有:
- mybatis.config:mybatis-config.xml配置文件的路徑
- mybatis.typeHandlersPackage:掃描typeHandlers的包
- mybatis.checkConfigLocation:檢查配置文件是否存在
-
mybatis.executorType:設置執行模式(
SIMPLE, REUSE, BATCH),默認爲SIMPLE
3. 代碼
主函數:
使用註解方式annotation形式:
【Application.java】包含main函數,像普通java程序啓動即可
此外,該類中還包含和數據庫相關的DataSource,SqlSeesion配置內容。
注: @MapperScan ( sample.mybatis.mapper ) 表示Mybatis的映射路徑(package路徑)
@SpringBootApplication
@MapperScan("sample.mybatis.mapper")
public class Application implements CommandLineRunner {

    @Autowired
    private CityMapper cityMapper;

    public static void main(String[] args) {
        SpringApplication.run(Application.class, args);
    }

    @Override
    public void run(String... args) throws Exception {
        System.out.println(this.cityMapper.findByState("CA"));
    }

}
xml方式:mybatis-config.xml:
<?xml version="1.0" encoding="UTF-8" ?>
<!DOCTYPE configuration
        PUBLIC "-//mybatis.org//DTD Config 3.0//EN"
        "http://mybatis.org/dtd/mybatis-3-config.dtd">
<configuration>
    <typeAliases>
        <package name="sample.mybatis.entity"/>
    </typeAliases>
    <mappers>
        <mapper resource="sample/mybatis/mapper/CityMapper.xml"/>
    </mappers>
</configuration>
application.properties
spring.datasource.schema=import.sql
mybatis.config=mybatis-config.xml
定義一個java的實體類:
public class User {
   Integer id;
   String name;
   Integer age;

}
說明:該接口中有兩個方法,
- 一個普通插入:直接用 @Mapper 註解搞定
- 一個插入返回主鍵:需要使用xml來搞定
import org.apache.ibatis.annotations.Mapper;
import org.apache.ibatis.annotations.Param;
import org.apache.ibatis.annotations.Select;
/**
* Created by Administrator on 2016/9/2.
*/
@Mapper
public interface UserMapper {
    @Select("select * from user where name = #{name}")
    User findUserByName(@Param("name")String name);
   /**
    * 插入用戶,並將主鍵設置到user中
    * 注意:返回的是數據庫影響條數,即1
    */
    public int insertUserWithBackId(User user);

}
xml文件: <?xml version="1.0" encoding="UTF-8" ?>
<!DOCTYPE mapper PUBLIC "-//mybatis.org//DTD Mapper 3.0//EN" "http://mybatis.org/dtd/mybatis-3-mapper.dtd">
<!-- 指定工作空間,要與接口名相同,源代碼沒有去看,猜測應該是通過"這裏的namespace.下邊方法的id"來定位方法的 -->
<mapper namespace="com.xxx.firstboot.mapper.UserMapper">
<!-- 若不需要自動返回主鍵,將useGeneratedKeys="true" keyProperty="id"去掉即可(當然如果不需要自動返回主鍵,直接用註解即可) -->
<insert id="insertUserWithBackId" parameterType="User" useGeneratedKeys="true" keyProperty="id" >
<![CDATA[
INSERT INTO tb_user
(
username,
password
)
VALUES
(
#{username, jdbcType=VARCHAR},
#{password, jdbcType=VARCHAR}
)
]]>
</insert>
</mapper>
service使用:
import org.springframework.beans.factory.annotation.Autowired;
import org.springframework.web.bind.annotation.RequestMapping;
import org.springframework.web.bind.annotation.ResponseBody;
import org.springframework.web.bind.annotation.RestController;


public class UserService {
	@Autowired
	UserMapper userMapper;

	public String user(){
		User user = userMapper.findUserByName("王");
		return user.getName()+"-----"+user.getAge();
	}
}
四、mybatis-spring方式
這種方式和平常的用法比較接近。需要添加 mybatis
依賴和 mybatis-spring
依賴。
然後創建一個 MyBatisConfig
配置類:
/**
 * MyBatis基礎配置
 *
 * @author liuzh
 * @since 2015-12-19 10:11
 */
@Configuration
@EnableTransactionManagement
public class MyBatisConfig implements TransactionManagementConfigurer {

    @Autowired
    DataSource dataSource;

    @Bean(name = "sqlSessionFactory")
    public SqlSessionFactory sqlSessionFactoryBean() {
        SqlSessionFactoryBean bean = new SqlSessionFactoryBean();
        bean.setDataSource(dataSource);
        bean.setTypeAliasesPackage("tk.mybatis.springboot.model");

        //分頁插件
        PageHelper pageHelper = new PageHelper();
        Properties properties = new Properties();
        properties.setProperty("reasonable", "true");
        properties.setProperty("supportMethodsArguments", "true");
        properties.setProperty("returnPageInfo", "check");
        properties.setProperty("params", "count=countSql");
        pageHelper.setProperties(properties);

        //添加插件
        bean.setPlugins(new Interceptor[]{pageHelper});

        //添加XML目錄
        ResourcePatternResolver resolver = new PathMatchingResourcePatternResolver();
        try {
            bean.setMapperLocations(resolver.getResources("classpath:mapper/*.xml"));
            return bean.getObject();
        } catch (Exception e) {
            e.printStackTrace();
            throw new RuntimeException(e);
        }
    }

    @Bean
    public SqlSessionTemplate sqlSessionTemplate(SqlSessionFactory sqlSessionFactory) {
        return new SqlSessionTemplate(sqlSessionFactory);
    }

    @Bean
    @Override
    public PlatformTransactionManager annotationDrivenTransactionManager() {
        return new DataSourceTransactionManager(dataSource);
    }
}
- 10
- 11
- 12
- 13
- 14
- 15
- 16
- 17
- 18
- 19
- 20
- 21
- 22
- 23
- 24
- 25
- 26
- 27
- 28
- 29
- 30
- 31
- 32
- 33
- 34
- 35
- 36
- 37
- 38
- 39
- 40
- 41
- 42
- 43
- 44
- 45
- 46
- 47
- 48
- 49
- 50
- 51
- 52
- 53
- 10
- 11
- 12
- 13
- 14
- 15
- 16
- 17
- 18
- 19
- 20
- 21
- 22
- 23
- 24
- 25
- 26
- 27
- 28
- 29
- 30
- 31
- 32
- 33
- 34
- 35
- 36
- 37
- 38
- 39
- 40
- 41
- 42
- 43
- 44
- 45
- 46
- 47
- 48
- 49
- 50
- 51
- 52
- 53
上面代碼創建了一個 SqlSessionFactory
和一個 SqlSessionTemplate
,爲了支持註解事務,增加了 @EnableTransactionManagement
註解,並且反回了一個 PlatformTransactionManager
Bean。
另外應該注意到這個配置中沒有 MapperScannerConfigurer
,如果我們想要掃描MyBatis的Mapper接口,我們就需要配置這個類,這個配置我們需要單獨放到一個類中。
/**
 * MyBatis掃描接口
 *
 * @author liuzh
 * @since 2015-12-19 14:46
 */
@Configuration
//TODO 注意,由於MapperScannerConfigurer執行的比較早,所以必須有下面的註解
@AutoConfigureAfter(MyBatisConfig.class)
public class MyBatisMapperScannerConfig {

    @Bean
    public MapperScannerConfigurer mapperScannerConfigurer() {
        MapperScannerConfigurer mapperScannerConfigurer = new MapperScannerConfigurer();
        mapperScannerConfigurer.setSqlSessionFactoryBeanName("sqlSessionFactory");
        mapperScannerConfigurer.setBasePackage("tk.mybatis.springboot.mapper");
        return mapperScannerConfigurer;
    }

}
- 10
- 11
- 12
- 13
- 14
- 15
- 16
- 17
- 18
- 19
- 20
- 10
- 11
- 12
- 13
- 14
- 15
- 16
- 17
- 18
- 19
- 20
這個配置一定要注意 @AutoConfigureAfter(MyBatisConfig.class)
,必須有這個配置,否則會有異常。原因就是這個類執行的比較早,由於 sqlSessionFactory
還不存在,後續執行出錯。
做好上面配置以後就可以使用MyBatis了。
關於分頁插件和通用Mapper集成
分頁插件作爲插件的例子在上面代碼中有。
通用Mapper配置實際就是配置 MapperScannerConfigurer
的時候使用 tk.mybatis.spring.mapper.MapperScannerConfigurer
即可,配置屬性使用 Properties
。
四、mybatis
註解批量插入:
@Service @Mapper public interface SynonymMapper { @Select("select * from nlp_chinese_synonym where word1 = #{word1}") public List<SynonymEntity> findWord1(@Param("word1")String word1); @InsertProvider(type = SynonymMapperProvider.class, method = "inserList") public int inserList(List<SynonymEntity> synonymEntityList); public static class SynonymMapperProvider { public String inserList(Map<String, List<SynonymEntity>> entity) { List<SynonymEntity> list = entity.get("list"); StringBuilder stringBuilder = new StringBuilder(256); stringBuilder.append("insert into nlp_chinese_synonym (word1,word2,value,ctime) values"); MessageFormat messageFormat = new MessageFormat("(#'{'list[{0}].word1},#'{'list[{0}].word2},#'{'list[{0}].value},#'{'list[{0}].ctime})"); for (int i = 0; i < list.size(); i++) { stringBuilder.append(messageFormat.format(new Integer[]{i})); stringBuilder.append(","); } stringBuilder.setLength(stringBuilder.length() - 1); stringBuilder.append(" ON DUPLICATE KEY UPDATE value =value,ctime=ctime"); return stringBuilder.toString(); } } }


